
Press Like a Pro: 4 Tips for Improving Your Shoulder Press
Don't underestimate the seemingly simple strict military press! While it might look basic, this exercise packs a powerful punch, offering a treasure trove of benefits for your upper body. Forget fancy equipment or complex movements - all you need is a barbell and dedication. What's the reward? Imagine stronger shoulders, a sculpted back, and improved core stability. Ready to unlock your potential? Dive into the world of the shoulder press and watch your fitness journey soar!
Keep reading for my top four tips to press like a pro:
- Set your feet like a tripod + Rotate your thighs out to engage your glutes
This one might sound familiar if you read my previous blog on deadlifts or squats. Many of the set up cues are actually very similar, we want to create a strong base through our feet to support us pressing weight overhead.
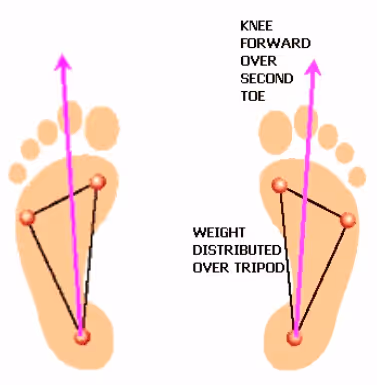
Press your weight through your big and little toe joints as well as your heel. The goal is to have equal weight distribution throughout your foot, you shouldn’t feel like your weight is all in your toes or your heels.
Pay close attention to the first few seconds of this video. You’ll notice I am driving my thighs out against the band. The goal is to drive your thighs out while keeping your feet in a tripod position.
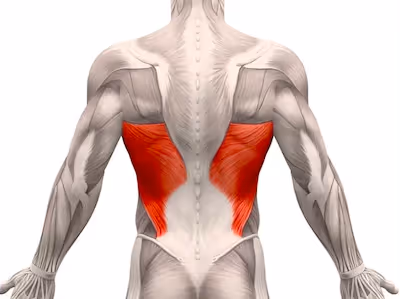
2. Engage your lats
The bar is in front of you when setting up your shoulder press, but it is actually quite similar to the squat. Look how big your lats are and where they attach in your lower back (the red muscle in the photo). The white area your lats attach to is called your thoracolumbar fascia. By engaging your lats, you will create extra stability at your low back.
Use the cues “break the bar,” “bend the bar” as you get under the bar and place it on your shoulders to engage all of your back muscles.
3. Brace your core
Bracing does not involve “sucking in.” In fact, we want to create pressure to support our spine 360 degrees. Most people are good at using their six pack muscles called the rectus abdominis, but this can lead to a “doming” at the belly and can actually cause extra compression at the spine. Most of my patients benefit from cueing for bracing laterally. Check out this awesome video from Squat University to see what this looks like live!
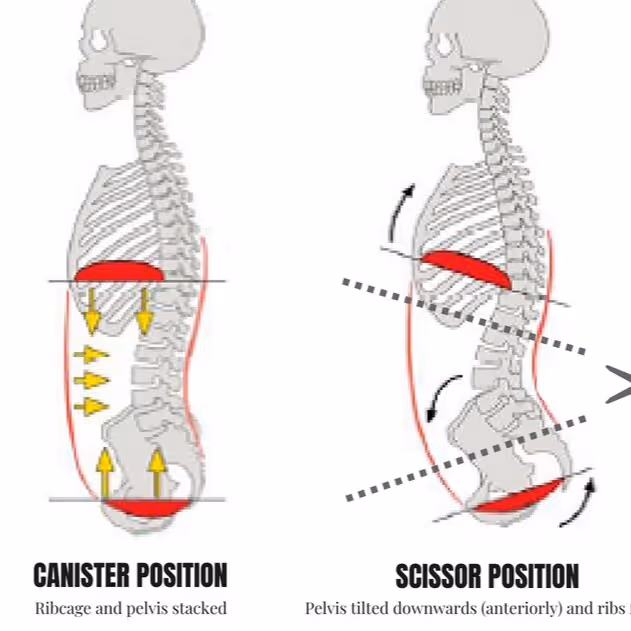
While performing the press, as long as you can maintain your brace or “canister position”, it is safe to press with a fixed extension in your thoracic spine, meaning you will stay neutral through your lower back, but create an arch in your upper back that you maintain as you press the bar overhead.
4. Lockout
Lockout with a "proud chest." At the top of the press, fully extend your elbows and squeeze your shoulder blades together. Think about "pushing the ceiling away" with your chest held high. This ensures complete range of motion and activates more muscle fibers.
If you’ve been keeping up with previous blogs, you’ll notice the cues really haven’t changed. This wasn’t an oversight or a typo. It is because no matter what lift you are setting up, our goal is the same: create stability through the trunk to maintain a good canister position. From here, you can add the appropriate leg or arm movement depending on what lift you are working on. Once you learn proper “grounding” through your feet and hips, how to brace your core and engage your lats, you will be set up for success!
In good health,
Dr. Eliza Cohen
Performance Physical Therapist + Wellness Consultant
Wilmington, NC
IG: @conquermovementpt @doctor_cohen14